
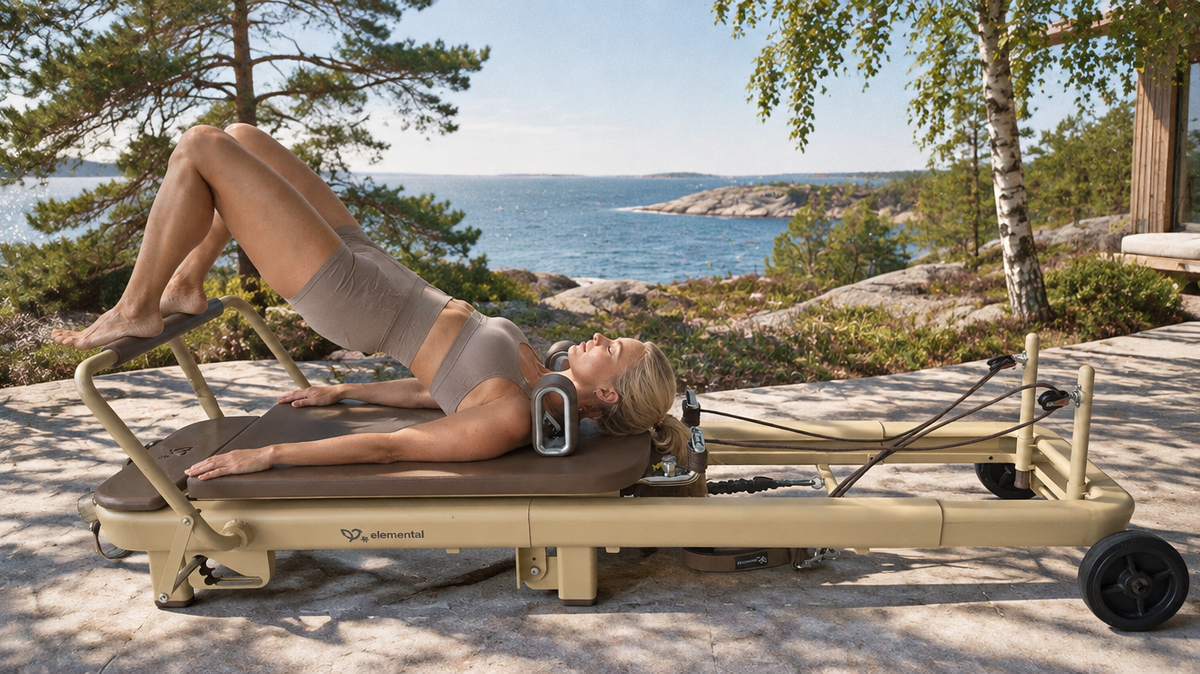
Shoulder Bridge on the reformer lifts the pelvis into a long diagonal from shoulders to knees, then asks the hamstrings and glutes to move the carriage while the trunk holds that shape. Because the feet sit on the footbar, higher than the pelvis, the reformer version places more emphasis on the lower spine and the back of the legs than a bridge on the floor. Done well, you feel it in the back of the thighs and the seat, never in the neck or lower back.
Written by the Elemental Movement Lab and reviewed by Samantha Giam, certified classical Pilates instructor. Updated 1 October 2026.
How this guide was researched: we reviewed 10 leading sources, five instructor videos analysed scene by scene (91 scenes of instruction) and five written guides. We logged 27 findings and how many sources agree with each. Where sources disagree, we say so. All 10 are listed at the end.
Setup
- On an Elemental Reformer TerraFold™, press the footbar down firmly on both sides before you start. It has no lock and is held by its own weight, and in this exercise your feet push against it.
- Choose the springs your instructor recommends. Two sources agree that the lighter the springs, the harder the hamstrings work.
- Lie with your shoulders against the shoulder rests and your head resting on the flat carriage, arms long by your sides, palms pressing lightly down.
- Place your heels or the balls of your feet on the footbar, hip-width apart, knees in line with your second toes, weight even across both feet.
The anatomy: what is working, and why
Seven of the 10 sources name the glutes and hamstrings as the prime movers. The full picture looks like this.
| Role | Muscles | What they do in Shoulder Bridge |
|---|---|---|
| Prime movers | Gluteus maximus, hamstrings | Extend the hip to lift and hold the pelvis. The hamstrings also bend and straighten the knee as the carriage moves. |
| Deep stabilisers | Transversus abdominis, internal and external obliques | Keep the ribs connected to the pelvis so the lift comes from the hips, not from arching the lower back. |
| Spinal articulators | Rectus abdominis, erector spinae | Control the roll up and roll down one vertebra at a time. |
| Alignment | Adductors (inner thighs), deep hip rotators | Keep the knees parallel and stop them splaying out or falling in. |
| Support | Calves, latissimus dorsi, triceps | Steady the feet on the bar. The arms pressing down switches on the back of the body. |
Why the reformer changes it: with the feet on the footbar, the pelvis starts lower than the feet. That angle asks more of the lower spine and the abdominals to begin the lift. The moving carriage then adds a second job: the hamstrings must lengthen and shorten under spring load while the trunk holds its line.
A useful cue: placing the feet slightly closer, so the ankles sit nearer to under the knees, tends to bring in more glute. Further away brings in more hamstring.
The five moments you should really feel it
- The first peel. Before anything moves, tip the pubic bone towards your nose and peel the tailbone up. The carriage should not move at all. You feel this low in the belly. If the carriage shifts, your legs are pushing instead of your centre lifting.
- The top of the bridge. Weight across the shoulder blades, a clear space under your neck, a straight “ski slope” from shoulders to knees. Think of anchoring the heels and gently drawing them towards your seat: you feel the seat and the back of the thighs switch on together.
- Pressing the carriage out. As the legs lengthen, the hamstrings work long, just above the back of the knee. Keep the line from heels to shoulders. The pelvis may lower slightly to hold that line, but it should never sag or break at the hip.
- Drawing the carriage in. The hardest part, and the one most people rush. The hamstrings curl the carriage home against the springs. On light springs this is intense.
- The roll down. Lower the spine one vertebra at a time, the tailbone touching down last. Going up can be a little quicker; coming down should always be slower.
How people get it wrong
| Mistake | What it looks like | The fix |
|---|---|---|
| Weight on the neck | Lifting too high, the chin jammed towards the chest | Stop when the weight reaches the shoulder blades. Height is not the goal; the diagonal line is. |
| Hip flexors taking over | A pinch at the front of the hip, or an ache in the lower back | Relax the front of the hips. Anchor through the heels and lift from the back of the legs. |
| Arching the lower back | Ribs flaring, the belly doming upward | Lower the hips slightly and soften the front ribs down. |
| Pressing the head down | The back of the head pushing into the carriage, the neck tense | Keep the head heavy but passive, the neck long. |
| Lifting in one stiff piece (when the aim is a roll) | The spine rises like a plank | Slow down. Peel and lower one vertebra at a time. |
| Carriage moves on the first lift | The legs push the carriage away as you start | Begin from the pelvis and abdominals. The carriage stays home until the bridge is set. |
| Locking the knees | The knees snap straight at the end of the press | Finish each press with the knees soft. |
| Pelvis tilting in single-leg work | One hip drops towards the carriage | Imagine a spirit level across your hips. Keep the free leg vertical, not drifting across the body. |
| Knees splaying or knocking | The knees drift out of line with the feet | Draw the inner thighs gently towards each other. |
| Rushing | The carriage bangs into the stopper on the return | Count the return slower than the push. |
Variations: a progression ladder
There are two valid ways to lift, and sources teach both. In the Hip Roll the spine peels up and down one vertebra at a time. In the Hip Lift the spine stays neutral and the pelvis rises and lowers in one piece. Learn both.
| Level | Variation | What changes |
|---|---|---|
| 1 | Pelvic tilt, or a partial bridge | The way back in if you feel it in your lower back. |
| 2 | Hip Roll and Hip Lift, carriage still | Learn articulation and a neutral lift. A small ball between the knees helps keep the legs aligned. |
| 3 | Static bridge hold | Hold the top for three slow breaths. |
| 4 | Carriage presses, balls of the feet, then heels | Heels shift the load into the hamstrings and glutes. |
| 5 | Lighter springs | Much more hamstring work on the return. |
| 6 | Arms reaching to the ceiling | A smaller base of support, so the legs and centre work harder. |
| 7 | Single leg, the free leg in tabletop or straight up | A big test of pelvic stability. |
| 8 | Single leg with carriage presses | Advanced: stability and strength together. |
| 9 | Classical mat Shoulder Bridge with leg sweeps | Joseph Pilates' original, the free leg sweeping down and up. Earn it on the reformer first. |
How to breathe
On the lift and the roll down, the sources agree: five of the 10 teach exhaling to lift, and five teach exhaling to roll down, often with an inhale or pause at the top.
- Inhale to prepare. Breathe wide into the back and sides of the ribs, keeping the belly gently drawn in.
- Exhale to peel up.
- Inhale at the top, or pause and stay steady.
- Carriage presses: inhale to press out, exhale to draw in. We put the exhale on the hardest phase, the hamstring curl home. Some schools reverse this and exhale on the press out. Both work; pick one and keep it steady.
- Exhale to roll down. One long breath out, one vertebra at a time.
Never hold your breath. If you cannot breathe steadily, reduce the range or the load.
Is Shoulder Bridge suitable for everyone?
No exercise is universal. If bridging causes pain, or you have a condition affecting the spine, hips, knees or neck, seek individual guidance from a qualified instructor or physiotherapist. During pregnancy, follow your health professional's advice.
Can you practise it at home?
Yes, once you know the movement and your reformer's springs. Press the footbar down on both sides before every session and check the shoulder-rest bolts are tight. See our weekly practice guide and Pilates for Runners and Surfers.
FAQs
Why do I feel Shoulder Bridge in my lower back?
Usually the lower back is arching to create height, or the hip flexors are doing the work. Lower the hips slightly, relax the front of the hips and lift from the back of the legs. If it persists, return to a partial bridge.
Why do my hamstrings cramp?
Often the glutes are not fully engaged, or the front of the hips is gripping to hold height. Lengthen through the front of the hips, use heavier springs and build up gradually.
Should my carriage move when I first lift?
No. Lift the bridge with the carriage still, then move it. That is how you know the lift came from your centre.
Sources
Videos were analysed scene by scene; written guides were read in full. Wording and recommendations are our own.
Videos
- Posture Pilates, Shoulder Bridge Series, Beginner to Advanced
- Pilates Encyclopedia, Bridging on the Reformer
- Physio Pilates Surry Hills, Hamstring Curls in Bridge on the Reformer
- McCrazy Fit, How to do the Shoulder Bridge
- Complete Pilates, The Pilates Bridge
Written guides
- myAcademy, Shoulder Bridge on the Reformer
- Pilates Club, Pilates exercise Shoulder Bridge explained
- Pilates Encyclopedia, The Pilates Bridge
- George Watts, Bridge on Reformer: 30 modifications
- Complete Pilates, Try the Pilates Bridge Exercise


